Making your own Airsoft M72 Rocket Launcher
Gungho Cowboy
23 Feb 2009
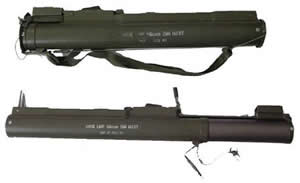
I've always been reading the website Instructables with their nice DIY instructions on making some cool stuff that you can play airsoft with. One of their DIY tips is making your own Airsoft M72 LAW Launcher. Well, there are already some launchers in the market into you can buy and play with immediately, but if you are the handyman or craftsman type, then you can follow the steps as shown below. All for the cost of US$60 without the grenade shell. Neat for those wanting a "Tour of Duty" impression.
This is the video on how the launcher works:
And here are the steps for you to make one (click on the links to read further).
Step 1: Materials
MATERIALS: 2" schedule 40 PVC or ABS pipe 2ft or longer. Fernco Proflex 2" to 1.5" shielded coupler. Part number 3001-215. Fiberglass cloth tape 10"-12" wide by 2 yard…
Step 2: Preparing to fiberglass an outside tube.
Buy a section of 2 inch schedule 40 ABS or PVC pipe. I use ABS since it is less expensive and is black. Wrap the pipe in wax paper. Then wrap it again with mylar film. …
Step 3: Preparing the fiberglass
Most people work with fiberglass matt for small projects because it is very cheap. However, I find using fiberglass cloth is much easier as we are working with a small dia…
Step 4: Make the outer tube
Mix the epoxy and make the outer fiberglass tube. Refer to resin instructions on proper mixing, mix ratios, cure time, and handling. This is not a fiberglassing instr…
Step 5: The Coupler
Once the fiberglass tube cures, pull out the ABS tube inside (wax paper makes this easy) and remove the mylar film and wax paper. throw away the mylar and the wax paper. …
Step 6: Assembling the outer tube and inner tube together
REMOVE the ABS/PVC pipe from inside the fiberglass tube. Decide how much travel you want the inside tube to have when you extended your LAW launcher. I decided for mine…
Step 7: Control Box and Locking Mechanism
Figure a way to make some sort of control box on top of the outer tube. I used sections of a 1 inch square pine dowel. I epoxied it to the top and reenforced with more fi…
Step 8: Install Airsoft 40mm grenade shell
I chose the Mad Bull XM PB4 40mm grenade shell for three big reasons. 1. It has the fill valve in the back. 2. It has a large gas reservoir. 3. It is CO2 capable. […
Step 9: Trigger rod
I used a a 1/8 thick by 3/4 inch wide aluminum bar. Iron or steel bar will work too. So will a round rod of some sort. Do what ever is best for you. Picture #1: Measu…
Step 10: All Done
All finished. Congratulations!! Fill with gas, insert rocket, and FIRE! WATCH THE VIDEO!!! - This was in a parking lot.