A Guide to Building Your Own SIG-556 AEG
Dom
28 Nov 2008
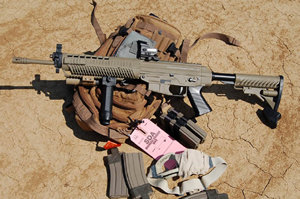
My need for a SIG-556 AEG started at the moment I first laid my eyes on those amazing pictures taken at this year's Las Vegas Shot Show. I always found the SIG line-up pretty interesting, but the airsoft versions were not convincing enough for me, until one day I saw a post on one of the airsoft news sites. My wait for a Magpul Masada was finally over when Guns Workshop (GWS) came out with a SIG-556 conversion kit. The SIG landed a lot closer to my heart than the Masada or I can say that this one actually hit the bull's-eye.
In real life, the SiG-556 uses an improved version of an AK's operating rod system with some FN-FAL elements and is wisely converted to receive M16/AR15 magazines. The unique design of the operating rod system gives wonderful accuracy to the 556, even if it does not have a true free float barrel.
It had outstanding reliability too, because it had an adjustable gas block, which allows the user to let more gas into the operating chamber if the rifle gets sluggish after extensive firing. Dave Anderson (who writes for Gun Magazine) produced a 0.84in five-shot group at 100 yards and this was outstanding with the .223. He also noted that this was the softest recoil rifle he ever fired. (Gun Magazine 2008 May, Superlative Semiauto). I think this was more than enough talk about the real steel. Let's get back to the fake steel.
I needed a SiG-552 as a base gun since this was only a conversion kit. There was no available donor in the whole country, so I had to look for a 552 to convert. Pawel at Gunfire.pl (Gun-Fire.com) helped me out and responded quickly to my need. My order went through lightning fast. Hats off to Pawel and his whole crew-fast response, prompt shipping.
I knew that this conversion kit was originally made for Tokyo Marui 552 but I figured that the JG version was about the same (if you know what I mean: $$$). I haven't had too much information about the kit prior to ordering it. All I knew was that I needed one before GWS totally sells out (already missed their AMD-65... trade anyone?).
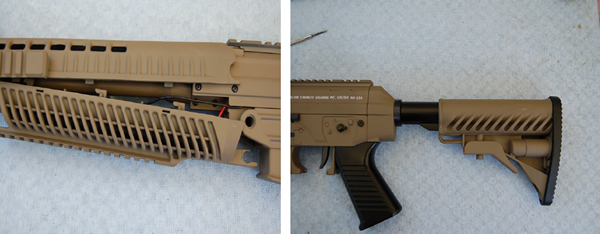
I was so excited when I opened the box, just like a little kid on Christmas morn. I quickly went through all the parts and made a quick inventory, trying to figure out how the parts connect without looking at the manual. The manual was a B&W photocopy without any text but it was really informative and foolproof. There was an upper and lower receiver, adjustable buttstock, outer barrel, handguard and flat top rail stashed in the relatively large box. I also found a couple of plastic bags with screws, a trigger guard and magazine converter, which allow me to use M4 magazines with the Version 3 gearbox.
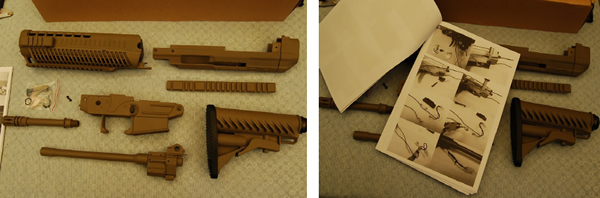
It looked like I had everything to start the project. There was only one thing missing from this kit-the pistol grip. The original one will fit, but it was different in color and not the right shape (I found only three cons and this was one). The handguard and buttstock were made of plastic, which were painted well. The quality of the handguard was second to none. It had a good feel and I knew before I installed it that it wouldn't squeak nor wobble, unlike the JG 552. The upper receiver had some pre-paint scratch marks but hardly noticeable. The only difference between the real steel and the airsoft receiver was the number of parts. The GWS receiver was made of three parts, instead of two, but this was the only way to squeeze in the gearbox and this was not a downside if it makes the assembly easier. The outer barrel was also great work. Two piece barrel, but the gas block and the handguard will make the whole thing firm. Here comes the second you'll need to take note of: the thread was not the usual thread so I need to make a converter in order to install a beautiful Noveske FirePig or a suppressor to hide a longer barrel. The JG 552 gearbox was capable of producing 400+ fps, so the barrel length can be increased if one likes to deliver precise shots, but then you might change the cylinder to a full one.
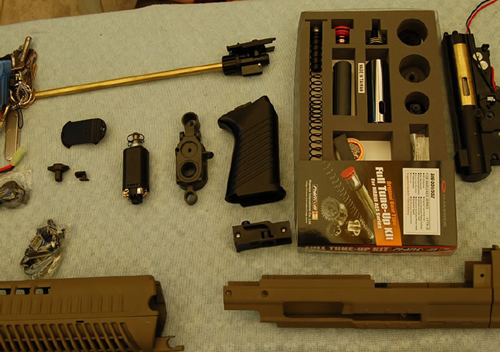
Hmmm... the lower receiver. It was a great work. If I don't count the fact that it was made out of two pieces just like a gearbox. I knew that this design would give me problems during installation.Please check Popular Airsoft Volume 1 Issue 1 (March 2008 Issue) to see how to blow up the JG 552. All I needed out of the donor gun were the gearbox, hop-up chamber, pistol grip, motor, ejection port cover and the gas block. I used a leftover SPR inner barrel, which I had to cut back to the right size (yes, you can do it if you know what you're doing).
Attila, who did the gearbox upgrade while I was assembling the external parts, only used the spring, the spring guide and the bushings out of that set. He said that changing those parts will give you maximum gain with minimum pain. He should have told me earlier not to buy the whole upgrade set... aarrggghhh!!!
Now on with the assembly...
Step 1 - My first move was to install the ejection port cover mechanism. This holds the top rail or iron sight as well, and it was my choice which one to install.

Step 2 - After installing this, I had to mount the back of the receiver to the upper receiver (one screw). Next up was to join the hop-up chamber with the magazine converter. After all this, I spent 30 minutes playing with the gearbox and its fire selectors. Thirty minutes more of tweaking with the grip/motor and wiring, and I was ready to test fire. Wow! It worked! I had to take it all out because the inner barrel assembly was supposed to go in first. I should have read the manual first...

Step 3 - I was finally ready to join the upper and lower receivers (one screw on each side at the back of the receiver right behind the fire selector). The wires had plenty of space to come out of the receiver so it's easy to slide in the outer barrel and lock it up with four screws (two on each side, mounted to the upper receiver).

Step 4 - The top part of the handguard easily slides under the gas block and locks in place without screws. The lower part of the handguard was joined to the lower receiver with a pin. Great design and I like the way the parts were interconnected. It makes the 556 rigid. I was able to feel it already. It looked like an AK without the stock, which was the last step for me. The installation of the buttstock was similar to the method used on the real steel. Piece of cake.
I tried to use 8.4V batteries but the 120 spring requires for a 9.6V Bruce Lee (Nunchuk). That was the largest battery configuration you can install inside this handguard.
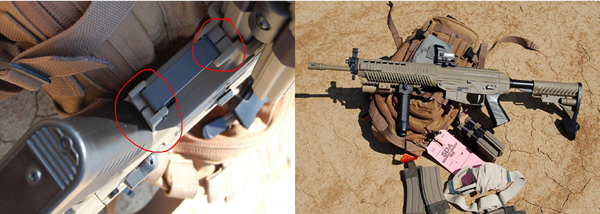
It was a beautiful piece of work but it gave me and Attila a big headache. Now I knew why this kit deserves a TM 552 donor. One of the pictures I took showed that the split lower receiver had a noticeable gap around the magwell/trigger. This one probably caused by the different gearbox size (I guess JG gearbox was a bit wider, but this one can be fixed and I was determined to find a way). The magazine catch could be a little bigger because it only holds the steel magazines (Classic Army), but the plastic ones (King Arms mid caps) fell right out. The ideal magazine could be G&P's steel short (Vietnam) magazine for this rifle. Regular flash hiders or suppressors cannot be attached because of different barrel ending, but the standard flash hider works just fine. The hop-up rubber cannot be changed without taking the gearbox completely out of the receiver. The 9.6V Nunchuk battery made it nose (front) heavy and the butt had no weight at all... Nevertheless, the gun was nice, rigid, unique, 400 fps, and... MINE!
Thanks to Felix of GWS, Pawel of Gunfire, Vic and my wallet!